Showing posts with label knitting. Show all posts

Sunday, 20 August 2017

Tutorial: Afterthought thumbs

When I learned to make mittens, the tutorial I found involved creating a thumb without a thumb gusset. I didn't know this at the time but it turns out this is called an afterthought thumb - probably because you do minimal work to set up for it! I love afterthought thumbs. They're a great way to get in to mitten or glove knitting.

This tutorial assumes you're following a pattern (like my Starry Starry Mitts) that use an afterthought thumb. It'll have details in it on how many stitches to knit on scrap yarn and how far into the palm you need to start the thumb stitches.

First off, as you're knitting the main part of the glove, you'll set up a hole that you'll knit the thumb into later. The pattern will say something like this: knit 8 stitches with scrap yarn, transfer stitches back to the left hand needle, then knit stitches with main yarn. Let's break this down step by step.

You'll need some scrap yarn. If you can, use a slippery yarn like cotton to avoid it felting with your main yarn. It also helps to use a colour that's very different to your main yarn so you can see it more easily later.

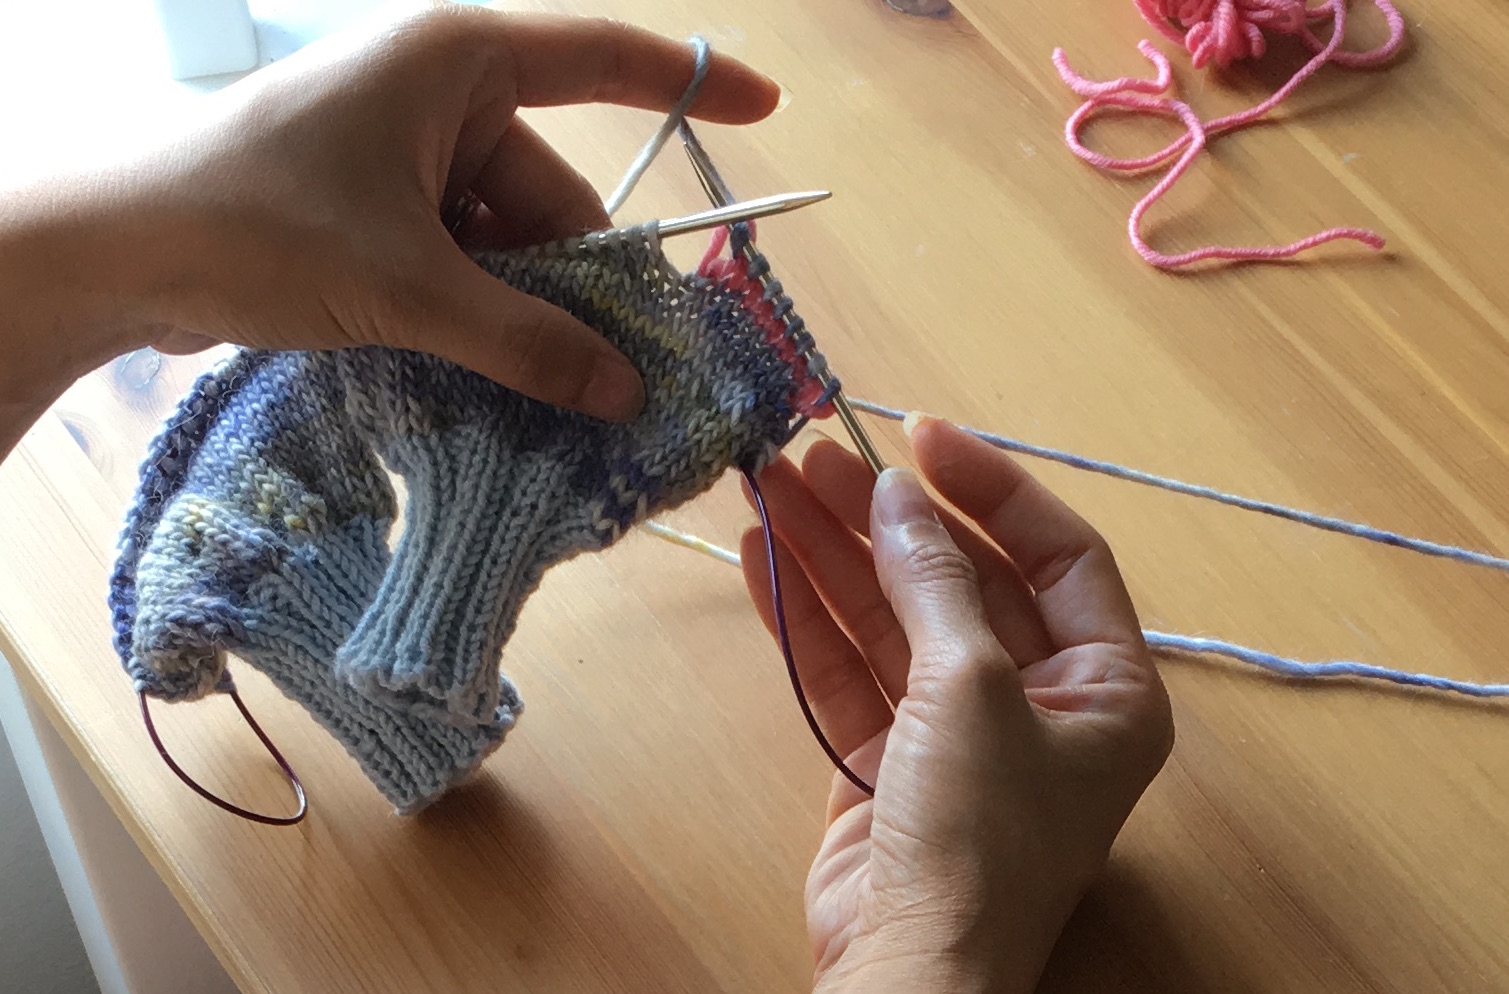
When you get to the thumb stitches, join your scrap yarn to your project and knit the indicated number of stitches with it.


Then, slip those stitches knitwise from the right hand needle back onto the left hand needle.


Leave a couple of centimetres for a tail and cut the scrap yarn. I also like to tie the two ends of the scrap yarn together.


Now, pick up your regular yarn and knit all the scrap yarn stitches.


That's it! Leave the knotted ends hanging on the inside of the mittens, and finish the rest of the mitten hands.

When the main part is done, your pattern will tell you to pick up the stitches around the thumb hole. Use a long cable needle for the magic loop method or DPNs.

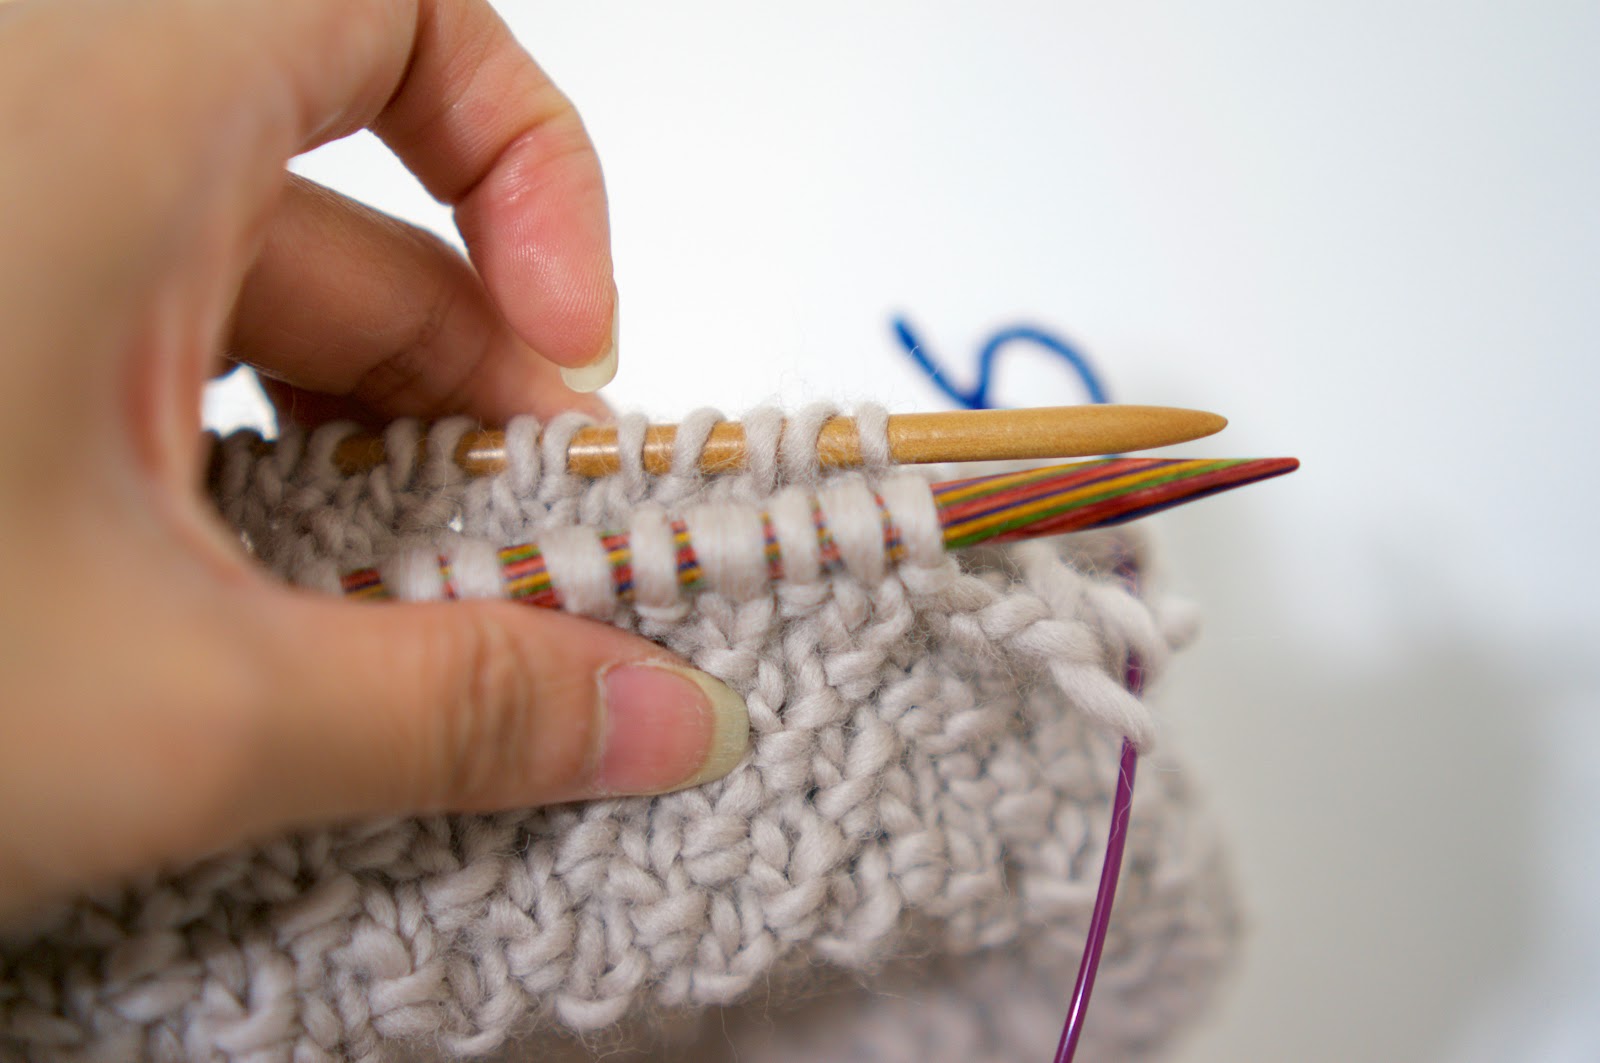
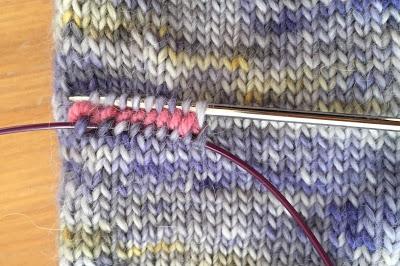
Take your needle and insert it into the left leg of each of the stitches in the row directly above the scrap yarn section, working from right to left. You should have the same number of stitches on your needle as the number of stitches you knit with the scrap yarn.


Then, if you're using a long circular, pull it so the stitches you just picked up are on the cable and your needle is free of the stitches. If you're using DPNs, just pick up another DPN.

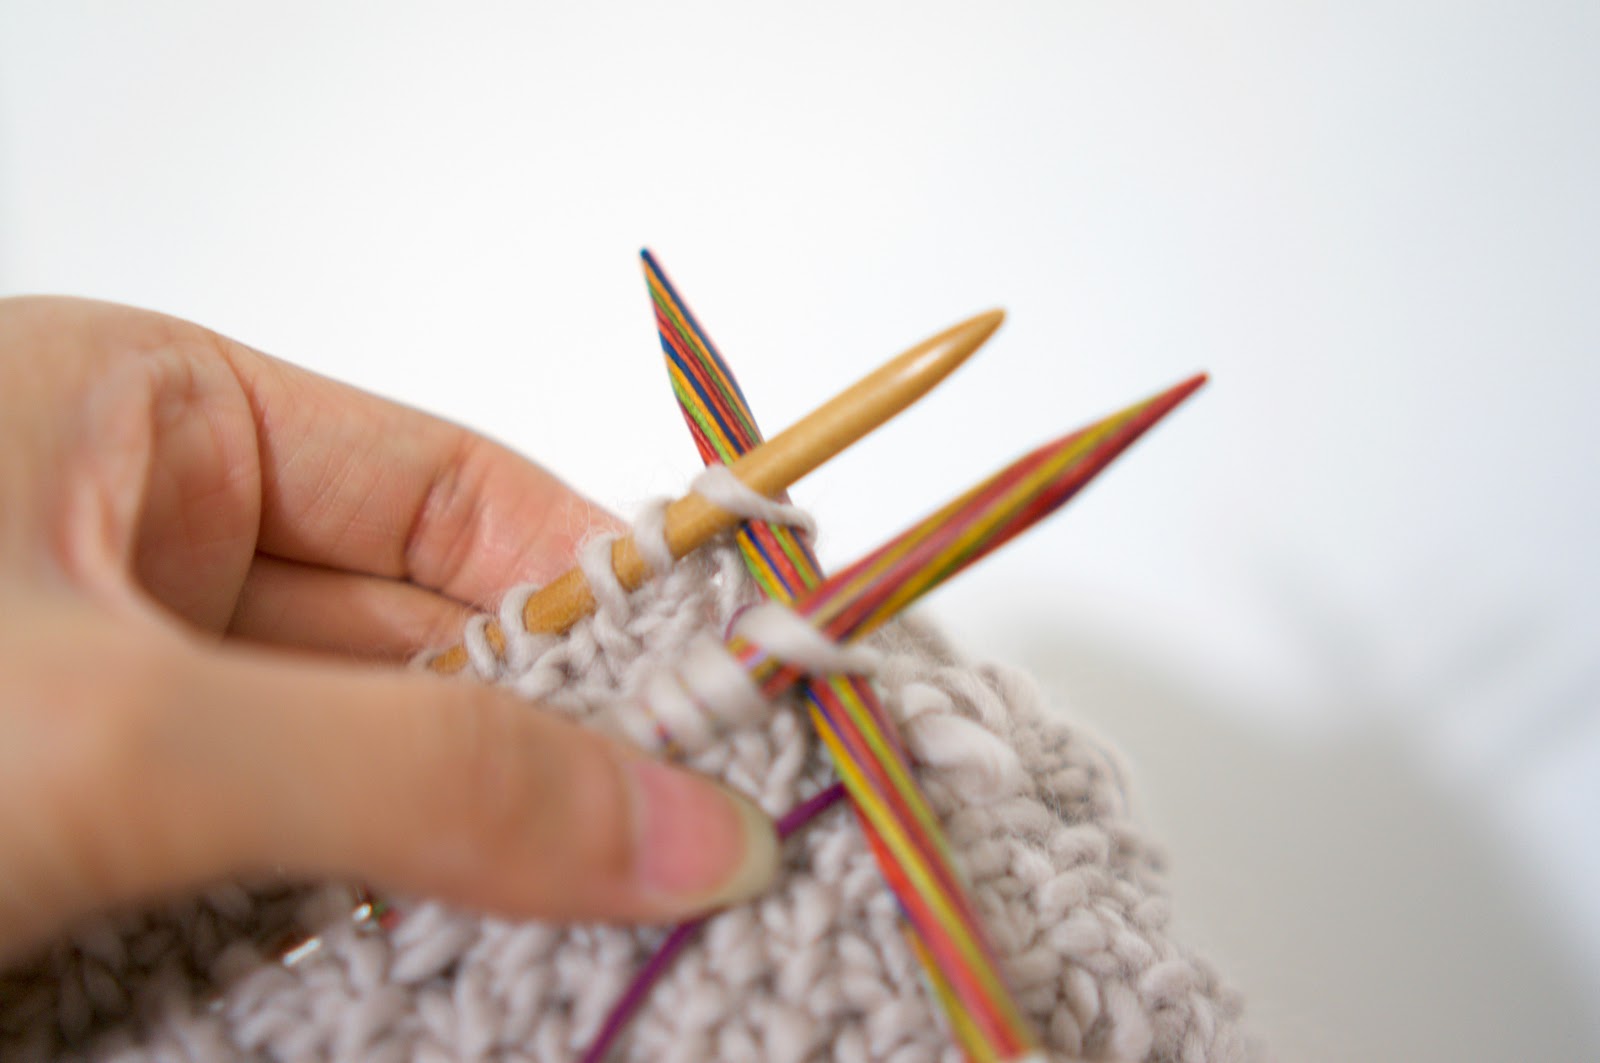
Turn your work upside down and using the needle, pick up the right leg of each of the stitches in the row directly above the scrap yarn section. Again, you should have the same number of stitches on your needle as the number of stitches you knit with scrap yarn.


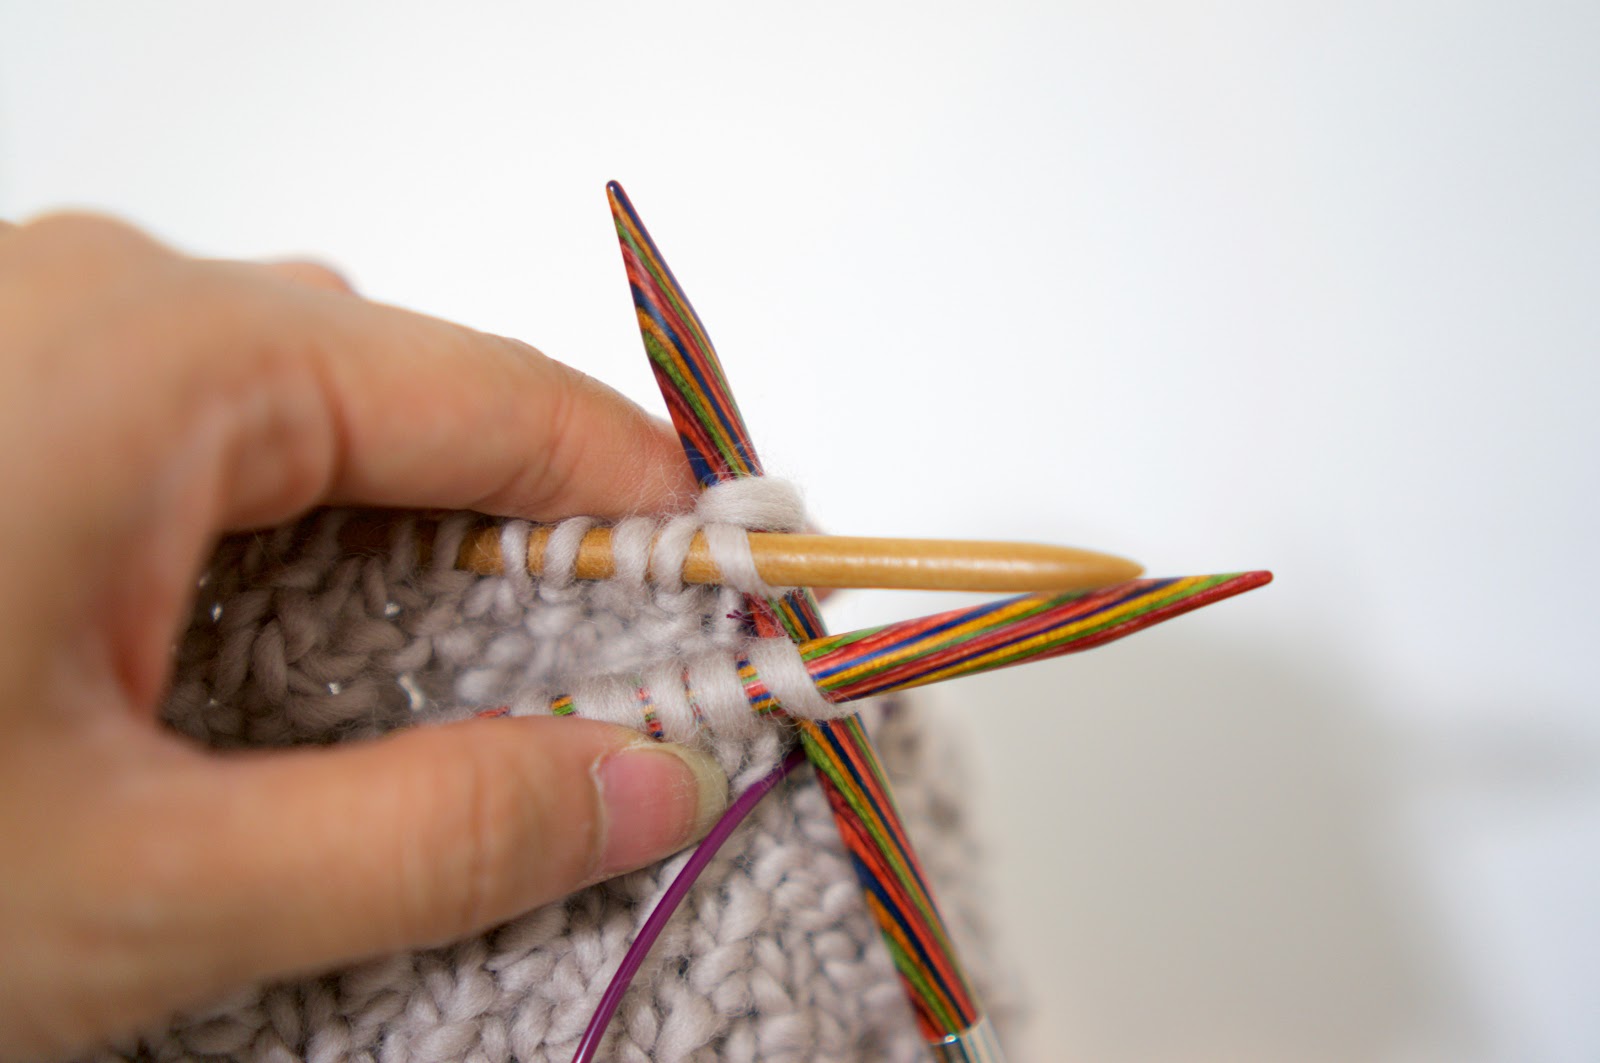
Now turn your work back the right way up and reach in to the glove to grab the knot you made in the scrap yarn ends. Cut it off. Then use a spare needle to unpick the scrap yarn stitches.


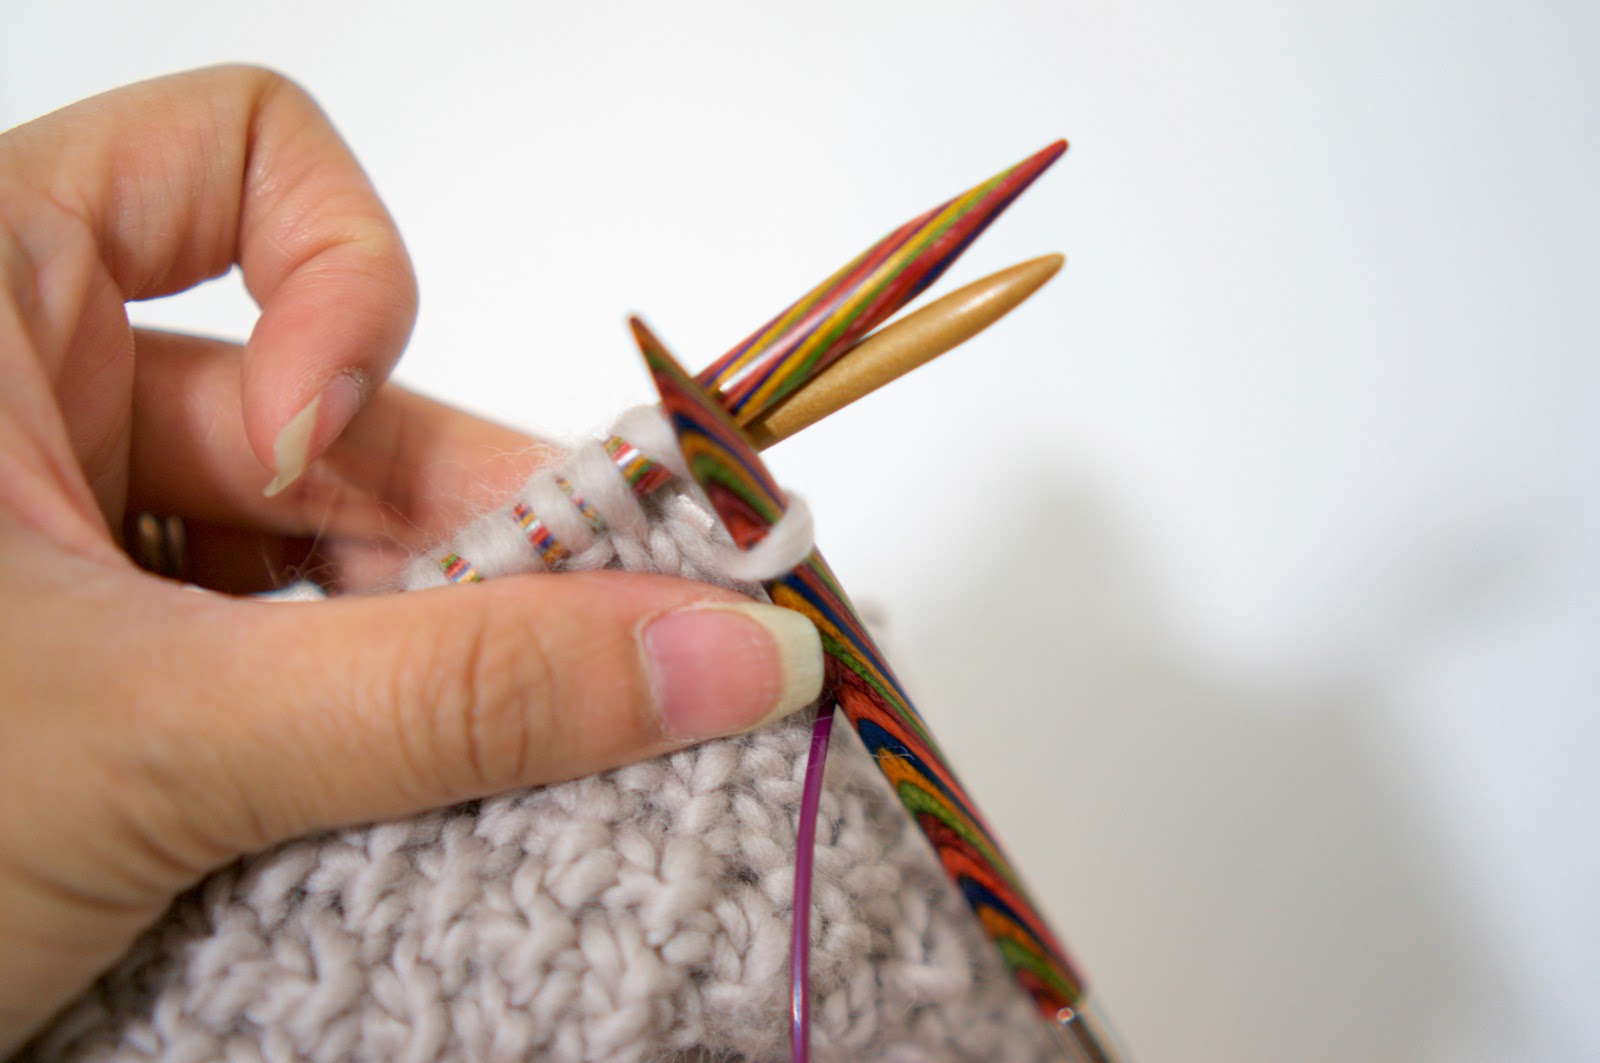
At this point, you have a hole for your thumb, and your stitches arranged on your needles ready to be knit.


Join your main yarn back onto the project and follow your pattern to knit the thumb.

When your thumb is finished, you may notice some small holes in the corners of the thumb. You haven't done anything wrong - it's just unavoidable with afterthought thumbs. When you're weaving in your ends, use the yarn tails to sew the holes shut.

One tip: To avoid these holes I like to pick up an extra stitch on the outer edge of each row I pick up. So if the pattern said to knit 8 scrap yarn stitches, when I pick the stitches up I'll pick up the stitch to the left and right of the 8 for a total of 10. Some patterns will tell you to do this, but some don't. If you do this but the pattern doesn't say to do it, make sure to decrease the extra stitches you created in the first or second round of the thumb.

If you'd like to try an afterthought thumb out, check out my Starry Starry Mitts pattern!

Sunday, 21 May 2017

Tutorial: Double brim beanies


Double brim beanies are lovely! Until I discovered them, I felt like all of the brims on beanies needed to be made up of ribbing. With double brims, though, you can use any stitch you want without the ends curling up, and they create a nice thick fabric so they stay snug even without being ribbed. 


To begin a double brim beanie, decide on your stitch pattern, how many sts you’ll need and how long you want the brim to be.

Cast on in the round using a circular needle and a provisional cast on, mark the first st of the CO with a removable marker, and work the brim until it’s as long as you’d like it to be. Then work a row of purl sts. These are are optional, but they help keep the bottom edge of the brim neat. Work the same number of rows as you did before the purl row.

Place the a quarter of the sts of the provisional cast on to a spare DPN. Remove the stitch marker and any waste yarn used for the provisional cast on from these sts.

Fold the brim along the row of purl sts so the sts on the DPN are on the inside of the round, behind the live sts. Line them up so the first stitch on the DPN is behind the first st of the round.


You will now knit the first stitches on both needles together.


Step 1. Insert the right needle of your circular needles into the first stitch on the front needle, then into the first stitch on the DPN.


Step 2. Wrap the yarn around the right needle as if to knit.


Step 3. Pull the yarn forward through both stitches.


Step 4. Drop the first stitch off both left hand needles. You have completed one stitch.


Repeat steps 1-4 for the remaining pairs of stitches.

Place the next batch of stitches of the provisional cast on onto the DPN, and repeat the process. Continue until all stitches have been knit together. Before knitting the last few sts closed, make sure the tail of your CO is tucked into the inside of the double brim - no need to weave it in to your work.

And you’re done! Now knit the body of the hat however you like, and you’ll have a beautiful snug double brim beanie.

Wednesday, 7 December 2016

Diagonal Stripe Scarf

I love cables, but have been wanting to play with creating texture and patterns with simple knit and purl stitches for a while. After making a bunch of Seed Stitch Scarves I figured giving a different textured scarf a shot would be fun. As it turns out, diagonal ribbing is fairly straightforward but looks amazing. The yarn is nice and chunky and warm so it's a pretty quick knit, and if you can't decide between the regular and infinity version, well, why not try both? ;)


Wednesday, 16 November 2016

The Basketseed Cowl

I have a soft spot for basketweave. When my mother realised that someone had taught me how to knit, she took pity on me and taught me how to purl. After I tried it for a while I realised that the knit and the purl sides of my knitting looked different, and I figured out how to do a somewhat modified basketweave stitch for myself. The first pattern I ever designed was a basketweave scarf.

Unfortunately the edges tend to curl up, but I've been wanting to try a chunky knit cowl pattern recently and knitting in the round seemed like the perfect solution to the problem of the edges curling. I've been playing with seed stitch a lot too recently and couldn't resist throwing some in, so the Basketseed cowl was born!


Click through for the pattern, or if you're pressed for time you can buy the finished product on Etsy!


Wednesday, 24 August 2016

Blanket capers

A long time ago, I stumbled across a crazy baby blanket pattern called OpArt on Knitty. The pattern was fairly hypnotic, and I wanted to make one but really didn't have an excuse to. Fast forward to mid 2012, and when one of my best friends found out that he and his wife were having a baby boy, I knew exactly what I wanted to make as a present for him!


Saturday, 23 July 2016

The Slouchy Mushroom Beanie

I love slouchy beanies. They make the perfect winter accessory - they keep you nice and warm, but they're still really stylish. I'm teaching a workshop on how to knit in the round soon, and I wanted to use beanie pattern that wasn't too complicated - just knit, purl, and some basic increases and decreases. After a bit of an internet search proved fruitless, I decided to just write my own.

I still had a ball of We Are Knitters yarn left over from my seed stitch scarves, so I decided to make a beanie that would match the scarf. This pattern doesn't use a whole ball - if you go buy yourself three balls and make the hat first, you can use the left overs to make your scarf a little longer.


Sunday, 17 July 2016

Seed stitch scarf set

Seed stitch is a beautiful way to add some texture to a garment, and it's great as a beginner's first pattern - all it uses is knit and purl stitches. I first made this chunky infinity scarf about three years ago, and it seemed like the perfect thing to make with a batch of yarn I got from We Are Knitters. Then I decided to make a regular version too. They ended up being lovely and soft and very, very warm.


If you'd like a matching beanie to go with your scarf, go check out the Slouchy Mushroom Beanie pattern.

Wednesday, 6 July 2016

Cutie Booties

Aren't these booties just the cutest little things? Our upstairs neighbours just had a baby so I made these as part of a care package that Wes and I gave them. I adapted the pattern from one that's worked flat - they're a little fiddly to work in the round but not having to sew them up at the end is a great feeling!


Thursday, 23 June 2016

Knitting stitch pattern: Honeycomb stitch


This hexagon stitch is a great first pattern for beginners who know how to knit and purl and want to start working with multiple colours. It's surprisingly easy to do but looks really impressive - a win-win situation if there ever was one!


Tuesday, 27 December 2011

Fabric-A-Brac

About a month ago, one of my lovely friends sent me a link to a rather irresistible event. As anyone even remotely crafty will tell you, having a drawer/box/wardrobe/bedroom's worth of material built up is a pretty common problem. Enter the Fabric-a-Brac! Essentially a market for material stashes, it looked like a decent opportunity for sellers to offload some old supplies and for buyers to grab a bargain.

To be honest, I wasn't expecting much and I already had a lot planned for the day, so I figured I'd just pop in for half an hour. My expectations seemed to be reinforced by the plastic flags and coloured paper flowers adorning the entrance to the building. But when I actually arrived, all of that was rather pleasantly blown the window.

Photo by Angus Forbes
The suite it was held in was both big and packed. There were tables and tables full of fabric and accessories, and wherever there wasn't a table, there was a person. A lot of the people were about my age too, which was reassuring. It was actually somewhat intimidating! As I may have mentioned before, I'm more of a knitter than a seamstress, so all the fabric sent my head into a spin.


Luckily one of the first tables I found was full of wool, so I managed to calm down a bit with something familiar. If you haven't noticed yet, my favourite colour is purple. I've told and told and told myself that I won't buy any more purple clothes or wool, but I just couldn't help myself. There were balls of a maroon cashmere/silk blend for $4 a pop. Usually something like that would cost about $12 at my local wool store, so I went ahead and snapped it up. I have a vague idea to make a little lacy bolero with it, but I have to try and find a pattern for one!

Photo by Angus Forbes
Having armed myself with some wool, I decided to take on the fabric. Most of the fabric shopping I've done previously has been based on whatever brightly coloured print catches my eye, and I don't have much of a handle on what to look for when it comes to different fabric compositions - although I do know that somewhat thickish, quilting-weight cotton makes for nice pouches. Narrowing in on something good when you're faced with this much unfamiliar product is hard though!


After circling around the whole studio once or twice and still having no idea, I fell back to my normal shopping method. Usually when I want to buy something I'll find something I like, walk out of the store, and if it's still on my mind about it an hour later I figure I actually do like it and I'll go back and buy it. Yes, I am somewhat indecisive. After two goes around the studio, the only thing that I was still thinking about was a small strip of thick textured cotton in a nice retro bluish print. I couldn't remember exactly where it was, so I went round again until I found it. Strangely enough the stall owner had no idea how much to sell it to me for so we just came to some mutual agreement on pricing - I don't even remember how much it was now! The material will be up in the Oli-store soon if you'd like a pouch made out of it.


The last stop was a table that I had spotted that was selling patterns. I've never sewn up a piece of clothing before, and to be honest sewing patterns scare me. But I've been wanting to try it for a while. I really want to make myself a skirt out of some sort of spotty black and white material that's a decent length - mid-length skirts are a surprisingly difficult thing to find in shops at the moment! I started rummaging through the pattern box and lo and behold, there was a nice skirt pattern. Even better, both the packaging and the store owner told me that it was an easy one to follow, so I added it to the shopping bag. The owner also told me that the pattern would look nice with some sort of lace or trimming on it, and I should go find myself some.

Luckily in my confused wandering around the studio I'd spotted a trimmings stall. I managed to score myself some black lace which would go nicely with any spotty black and white skirt material.


I really wanted to go find myself some material for the skirt, but by this point my 30 minutes was up. I left the studio very very reluctantly, but with a bag full of goodies. Hopefully it'll be on again sometime soon, and I can find a friend to go with who knows what they're looking for so I'm not completely lost!

Sunday, 23 October 2011

Starting from Scratch


I don't actually remember when I learnt how to knit, or who taught me. I know, though, that the first thing I learnt to make were padded hangers - I thought they were pretty daggy, but Steph loved them so I kept making them for her as presents. I love them now too and I have quite a few in my wardrobe. They're ridiculously simple to knit, you just make a rectangle out of plain knit stitches, and the rest is in the sewing.

One of the hangers from my wardrobe
After knitting a lot of hangers, I remember that when my Mum first taught me how to purl it was a revelation. I noticed fairly early on that there was a difference between knitted and purled material, but no one ever sat me down and properly taught me the difference between garter and stockinette stitch. There's a scarf in my drawer from early high school (when I was 12 or so) that's made up in basketweave stitch, and I remember being so proud of myself because I figured out the pattern on my own.

My basketweave scarf
Since then I haven't really come up with anything on my own. I've taught myself (with lots of help from the internet!) how to do various increases and decreases, and I can alter a pattern, but I haven't ever just taken a ball of wool and some needles and winged it on anything more complicated than a rectangle. Part of the problem is that I absolutely hate ripping things out - it seems like such a waste of time and effort - so I knew if I ever wanted to start getting creative it would have to be something small.

When Zara opened in Sydney the lines were so ridiculous that Steph and I didn't venture in until a couple of weeks after it opened. All the good stock was pretty much gone (apparently on opening day 80% of the stock was gone in about 3 minutes!), but I picked up a nice top that was fairly plain except for the knitted bow that was sitting on it. It didn't occur to me straight away, but I realised the other day that it was nice and small and pretty simple to knit, so would make for an excellent first experimental project.

The knitted bow off my Zara top
Digging into my bag of scrap wool ended up being rather profitable - I found some merino from a hat I'd made for a cousin. There was a lot left over because she's eleven and her head is small, but being for an eleven year old girl, the wool was bright pink. It was lovely and soft though, so I went with it. The bow looked pretty easy to make - it just involved a main cylindrical part, and a smaller knitted loop to gather it in the centre. The main bit was going to be easy, but I (like most knitters, I think) hate sewing up seams, so I knitted it in the round. In retrospect it was so small that it probably would've been easier to just sew the side seam up!


Knitting in the round
The finished main tube

Once that part was done, it was just the little middle bit to do. Strangely enough, that was the part that caused the most trouble. Initially I made it way too big and it didn't gather the middle up well at all. It just sort of sat there loosely. I ended up finally biting the bullet and just ripping the whole middle out and starting again. It was actually somewhat liberating, although it still felt like a bit of a waste. I made it smaller, and it was still too big. It turns out that knitted material is much stretchier than I thought. I ended up making it comically small and just shoving the main part through it, and it came up nicely!


I stuck it on a bobby pin and I've worn it to work a couple of times. The pinkness of it makes me feel like I'm about 5, so I might try it again in a different colour. I'm really liking the pattern, especially since there's so many different things I can probably do with it - headbands, pins, decoration on clothing - so I might experiment with it a bit more and make them in different sizes to see what I can come up with :)