Showing posts with label why-am-i-a-masochist. Show all posts

Sunday, 29 April 2012

An Exercise In Patience


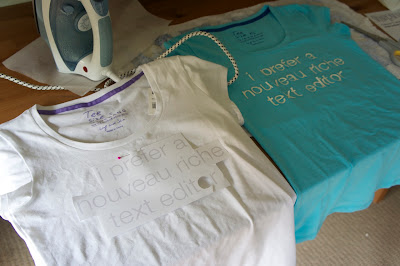
The company I work for is obsessed with t-shirts, to the point that one of our customers once joked that we were a t-shirt company masquerading as a software company. Most of the shirts we get made are fairly elaborate and designed in-house for special occasions, but one of our lovely designers decided to draw up unofficial plain text-based ones of memorable things people had said around the office. I really liked the designs, so for Christmas last year I asked her partner which ones they each liked the best, and took a crack at making them.

The original shirt designs - courtesy of @samthebridge

Luckily I found a couple of plain t-shirts at Giordano (although they didn't have a dark blue male one so I had to settle for green), then I wandered off to Lincraft to find t-shirt transfers. There were two types - for white and coloured backgrounds - so I grabbed a pack of the coloured ones.


I started out by printing out a couple of draft versions of the text to get the sizing right. It turned out that choosing the colour was also somewhat difficult - at first I thought a really light grey would be good, but when I tried it out it was too dark. Light cream ended up looking a bit closer to white so I just went with that.

Experimenting with colour and positon

When I bought the transfers, I had assumed that the coloured background type would be a clear sheet that you just printed your design on to and then could cut around roughly and iron on the shirts. To my horror, when I opened the packet the whole sheet was opaque white! I have no idea why they were for 'coloured backgrounds', but it left me with no choice but to cut out all the letters individually.


Oh. My. Goodness. In general I'm not a patient person but I usually get a bit pedantic with getting craft projects perfect. This was really pushing it though. I think all up for the two shirts I was cutting up letters for at least 2 or 3 hours - at least I can say I have excellent cutting skills now. The worst part was the letters like 'e' and 'b' that had bits that needed the middle cut out, and the one 's' I had to cut out was terrible. Whenever I hit an 'l' or a capital 'i' I was over the moon.

I'm about the same size as Sam, and I'd bought myself a shirt along with the two presents I'd gotten, so I was able to position the text in the right place by trying on my shirt with the draft copies I'd made earlier. I just sort've guessed for the other one!


I had a bit of a mishap with the green one - I stuck some paper over the letters and ironed them like the instructions said, but I didn't read all the instructions properly and took the paper off too early (it has to cool down before you peel it off, oops!). Some of the letters came off, so I just grabbed the practice copies of the letters and used them as stencils directly against the t-shirt transfer. It meant that some letters were cream and some were actually white, but given that the shirt said 'Suboptimal', it sort've made sense! I'm glad I did it first though - if I had done the blue one first and lots of letters had been ruined I would've cried.


I'm actually really happy with how they turned out. The edges of the lettering aren't quite perfect and some of them came out a bit wonky but it made the t-shirts feel a bit more personal than if it'd just been printed out by a machine. Plus, while the letters were a huge pain to cut out, not having large expanses of clear t-shirt transfer stuck to the shirt was awesome. As a finishing touch I put our company's logo on the back of the shirts where it appears on our official shirts - it was much easier to cut out than the letters were!



Tuesday, 18 October 2011

The joys of PVC

I've had a lot of fun over the last couple of days drawing logos and printing labels, but tonight I fought a terrible battle against some PVC - just one new fight in a long struggle that basically has me losing against a sadistic plastic enemy.

My zipper pouches - can you spot the shiny enemy?
First, some background - one of my favourite things to make are little zipper pouches in bright prints that you can use for pretty much anything (I currently employ one as a makeup case, one as my camera case and keep one for jewellery when travelling). I realised fairly early on that I could make them spill-proof by sewing a plastic outer layer onto them, so I tottered off to my craft store to see what I could find. They had some awesome PVC sheets - the type your grandparents keep on their dining table to protect the tablecloth - so I brought some home. 

It took a lot of effort the first night. There were lots of things I didn't realise the PVC would do and lots of different ways I didn't realise it would react to my machine (like stick to it!). But after some fighting I finally figured out the best way of sewing it into the pouches. While they're more difficult to make than the non-plastic coated ones, they look lovely and really are spill-proof. And when I went back to buy a second batch the sales lady was extremely helpful and put it on a big roll for me so I could store it without it getting crinkled. Not the easiest thing to carry home, but effective none the less. So I thought I had won the war - until tonight.


The dreaded PVC roll
My state of mind after fighting with it all night

My friend asked me to make a pouch with the plastic on the inside, to protect against any makeup that might spill from within. Innocently enough, I said yes, thinking it couldn't be much worse than the normal ones, and went to work. I'm not very quick at making them yet - usually one will take me half an hour or so - but I ended up working on this for close to two and a half hours all up.

It just wouldn't work! Seeing as the plastic was getting pushed inside the pouch instead of just sitting outside like usual, trying to line up the amount of slack in the plastic versus the amount of give in the material was a nightmare. Also, the lining starts off as being inside-out and gets flipped around, and all the pushing and pulling put a bit too much strain on the plastic and it split slightly. Needing to fix the hole, coupled with the fact that the PVC just refuses to go through my machine when I try to sew it without any material between it and the needle, meant I had to finish the bag off by hand. Being more of a knitter than a sewer my stitching is somewhat wonky. Luckily it was just for the inside! I was also lucky in that I had some really sharp hand needles that pierced the plastic fairly easily. My fingers are still feeling rather sore and well-pricked though.

I actually really like the final product. It's very durable-feeling, and it won't get dirty on the inside (which my makeup case is starting to do). I sort of want one for myself now but the idea of making another one is sending my brain into a spin, so it may just have to forever remain as a painful but successful one-of a kind experiment.


The finished product
The pretty, evil interior


If you want to make your own plastic pieces and I haven't scared you off it entirely, hang around for the next post and I'll write up some tips for trying to work with it.