Showing posts with label cooking. Show all posts

Tuesday, 3 January 2012

Christmas Cutting and Colouring


My family's always been into presents. I didn't realise until a few years ago that it was possible for people to 'not be present people'. Any celebration involving Steph, my parents and myself always involves some sort of cake and a lot of presents for the celebrant - it's just what we've always done. It's something that I've ended up extending to my friends, too, which possibly gets annoying at times - I routinely ignore any 'you don't have to bring me a gift' statement when I get an invitation to a party, and I usually get Christmas presents for my friends.

This year for Christmas I figured it would be nice to make something for everyone instead of buying things. I have a decently mixed group of friends - half guys and half girls, and everyone's interested in different things - so something edible seemed to be the go. Some of my fondest Christmas memories are of eating yummy sugar coated shortbread, so I figured I'd give it a stab. I went online to hunt down a recipe and found a nice looking Homemade Shortbread Recipe from allrecipes.com.

When I made a test batch, the dough seemed a bit wet, so I went ahead and just started adding flour until it seemed right. I didn't have any cookie cutters so I used my measuring cup as a stencil. They came out very short and crumbly but still very tasty. The extra flour made them a bit difficult to roll out but it was manageable enough.


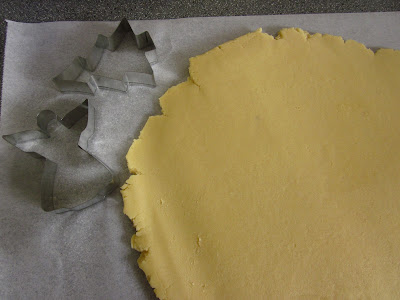
I figured I'd be a bit more Christmasy for the actual presents and borrowed Nick's Christmas shaped cookie cutters. After rolling out the dough, I started pressing down on it with the cutters. They tessellated surprisingly well but it was a bit difficult to peel away the surrounding dough. Steph came over, saw what I was doing, and gave it a shot. Instead of just pressing the cutters down, she started wriggling them around in the dough, and they came out much more easily. Apparently I missed the cookie-cutter lesson at preschool!

My cookie cutting attempt Steph's clearly superior skills

They took a surprisingly long time to bake but they made the kitchen smell fantastic. I'd never baked shortbread before this, and I got a bit impatient with the test batch and took them out a bit prematurely, so I didn't realise that they skip the golden brown stage and go straight to a toasted-brown colour. My oven's a bit uneven so the ones at the back were quite a bit browner, and the lighter ones definitely tasted better. If you're ever making shortbread definitely don't leave it in the oven for too long.

Finished product! The slightly toasted cookies from the back of the oven

I made a double recipe, and after the first batch there was still quite a lot of dough left over that I left in the fridge. When I took it out two days later it was rock hard - it turns out that the dough gets particularly unmanageable when it's cold. If you're going to store it in the fridge make sure you take it out a couple of hours before you actually need it so it can warm back up to room temperature.

I wanted to try something fun with the second batch, and thought the sugar that you sprinkle on top of the cookies was something that I could play with. I was wondering aloud to my friend if coloured sugar was something that existed. Lo and behold, searching for 'coloured sugar' gives some nice recipes so I went ahead and gathered some supplies.

It seemed simple enough. In my mind I was expecting the food colouring drops to slowly seep into the sugar, but when I first dropped the food colouring in it curled up and formed a strange little green ball! Instead of the colour spreading through the sugar it looked like the sugar was just getting stuck to the drops of food colouring.


I figured I'd done something wrong, so I tried it again with less food colouring. It still did it though, so I figured I'd just see what happened if I did what the instructions said and shook the jar, and all of a sudden it worked. I did it with the other colours too and it looked amazing. If you're planning on making some, be careful with your food colouring to sugar ratio - I didn't like the colour of the red sugar, so I kept adding more food colouring, and it turned out very red but oddly sticky. If you're planning on storing the sugar instead of using it straight away, apparently you can leave it out to dry on some foil overnight to reduce some of the stickiness from the moisture in it.


Having coloured sugar makes it a lot more obvious where you've actually managed to sprinkle the sugar onto the cookie. I was doing it with a spoon and it wasn't coming out very evenly - it might've been a good idea to find some cheap disposable salt shakers and do it that way. Also, putting yellow sugar onto straw coloured cookies is a bit redundant. Overall, though, they looked very lovely and cheerful.


Trying to choose colours for the different shapes was interesting. The Christmas tree and candy cane shapes were obvious enough, but what colour do you make an angel? At the end of the day I just picked some colours and stuck to them.


Colouring wise, my favourites were the little gingerbread-man shaped cookies. Nick came up with the idea of giving them different coloured shirts and pants, and I managed to master my sugar-sprinkling skills enough to pull it off.


The cookies went out to a couple of different people, and they all made it safely enough, albeit a little bit crumbled. The candy cane and shooting star ones seemed especially fragile - having long thin segments of crumbly cookies probably wasn't the best idea. My mum thought I should have stuck to the original recipe instead of adding extra flour so they'd be nice and buttery instead of being very short, so I'll have to give it a go next time. Most of the people who I gave them to seemed to like them though. Apparently Nick's family's batch got gobbled up very quickly by his little cousins - I think that having a tick of approval from a batch of little kids is a pretty good sign that you've done something right!

Friday, 28 October 2011

Fettucini Fantasies


And now, ladies and gentlemen, for something slightly different. I told you there would be food, so here it is!

I have an unhealthy obsession with pasta. I can live off it for days and days - I'm pretty sure that in the five days I was in Italy every lunch and dinner had some sort of pasta in it. It was one of the first things I experimented with when I started cooking for myself, and some of the early experiments with white sauce ended very badly (curdled milk, anybody?). Between that and the fact that chorizo, which I love, doesn't really go well with cream, I started trying tomato-based sauces instead.

The recipe below is the culmination of lots of experimentation with smooshing random recipes together and some awesome input from Steph. For one, there used to be hardly any sauce, but she's absolutely obsessed with tomatoes (she eats them like apples!), so I figured I should add more of them to make sauce and it came out nicely. She also taught me a neat trick with oily meats like chorizo - if you stick the meat in a cold pan and let it heat up with the pan, all the oil comes out of it and you don't have to add any extra oil to your cooking.

If you're not into meat, I've made a slightly altered version of this for my vegetarian friends before. Just substitute 2 tbsp oil for the chorizo in step 2, let it heat up a bit and then follow along with the rest of the recipe.

If you're planning on reheating this a day or two after, add a bit of water and stir it around before you pop it into the microwave or a pot so it doesn't dry out.


CHORIZO FETTUCINI

Serves 4
Prep time: 10 mins
Cooking time: 10 mins

Ingredients:
  • 2 Spanish chorizos, cubed
  • 4 medium tomatoes, cubed
  • 500g baby spinach
  • 10 button mushrooms, quartered
  • 2 cloves garlic, diced
  • Juice of 1 lemon
  • 500g egg fettucini
Method:
  1. Boil pasta according to packet directions in plenty of salted boiling water.
  2. While pasta is boiling, put the chorizo in a cold pan and set on medium heat until it is lightly brown and the pan is oily (about 3-5 minutes).
  3. Add the garlic and stir until the garlic is translucent.
  4. Add in the mushrooms, half the tomatoes and 1/4 cup of water. Lightly smash the tomatoes with the back of a wooden spoon.
  5. Leave cooking, stirring occasionally, on a low heat until the tomatoes have broken down. Top up with small amounts of water if it's looking dry.
  6. Add in the rest of the tomatoes, the spinach, the lemon juice and some cracked black pepper. Stir until the spinach has wilted.
  7. Mix sauce into pasta. Don't serve with cheese! It tastes a bit odd with it.
And that's it! Let me know if you try it and whether you like it or not :)